Glitch Art Generator
 Modern scientific illustration of Glitch Art Generator
The Ultimate Glitch Art Generator: Transform Photos into Cyberpunk Masterpieces
In the polished, high-definition world of digital photography, perfection has become commonplace. But where everyone strives for clarity, the boldest creators are embracing chaos. Welcome to the era of Glitch Art—the aesthetic of digital error, data corruption, and the retro-futuristic "cyberpunk" vibe.
For graphic designers, social media influencers, and digital artists, creating these distorted masterpieces used to require complex knowledge of Adobe Photoshop or actual code manipulation ("databending"). Not anymore.
Enter our Glitch Art Generator. This best-in-class tool allows you to instantly transform standard images into gritty, high-impact visuals using advanced digital distortion, pixel shifting, and RGB channel splitting.
In this guide, we will dive deep into how this tool works, why the "glitch aesthetic" is dominating visual trends, and provide a step-by-step masterclass on creating your own cyberpunk art.
What is the Glitch Art Generator?
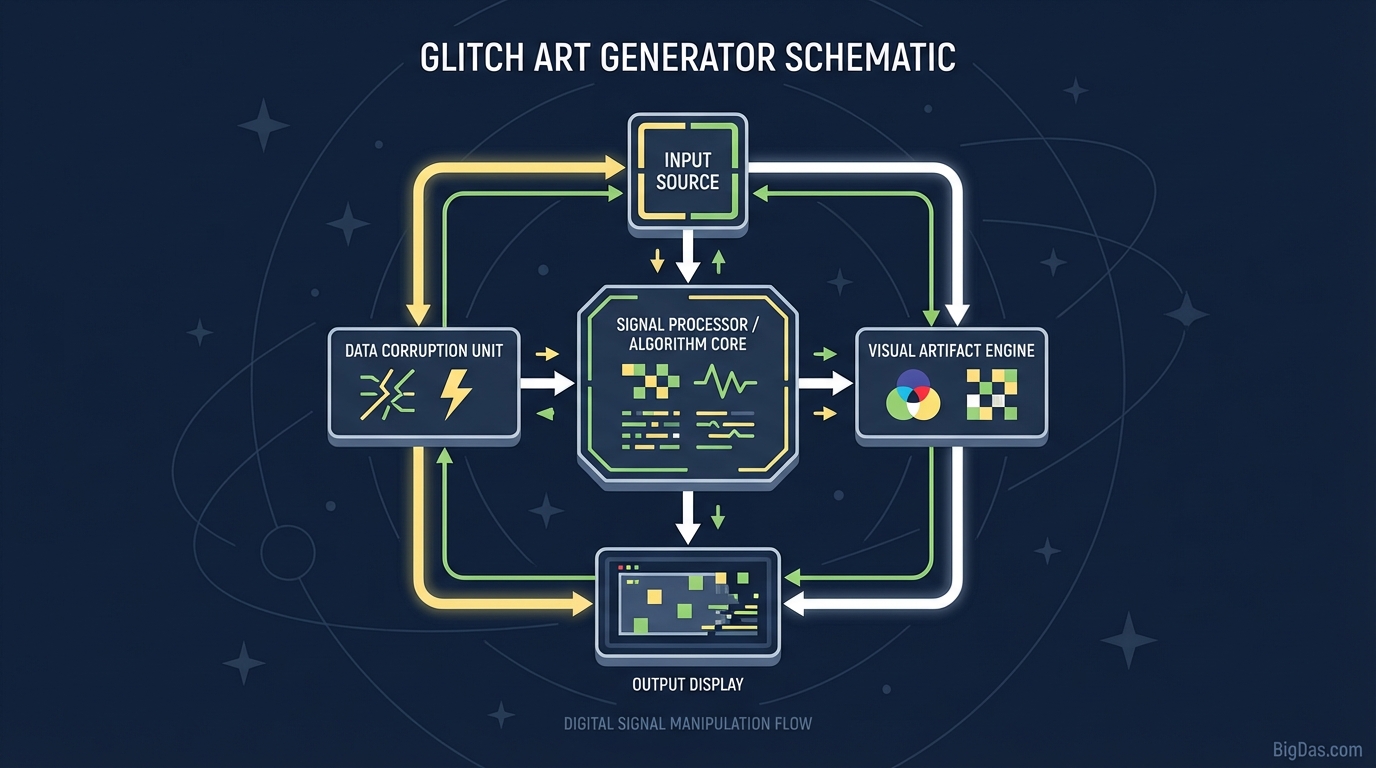
The Glitch Art Generator is a specialized image processing engine designed to simulate visual errors that typically occur in digital software or hardware crashes. However, unlike a real crash, this tool gives you total control over the chaos.
At its core, the tool manipulates the raw data of your image file. It disrupts the precise arrangement of pixels and color channels to create visual artifacts that look like a corrupted video stream, a broken VHS tape, or a hacked computer terminal from a sci-fi movie.
The Science Behind the Art
While the interface is user-friendly, the technology under the hood is sophisticated. The generator utilizes several key algorithmic processes:
- Pixel Sorting: This algorithm reorganizes pixels in rows or columns based on their brightness or color values. It creates that signature "melting" or "streaking" effect often seen in modern digital art.
- RGB Channel Splitting (Chromatic Aberration): Digital images are made of Red, Green, and Blue channels. This tool separates them and offsets their position, creating a 3D anaglyph or "ghosting" effect that adds vibration and energy to the image.
- Interlacing & Scanlines: Simulating the cathode-ray tube (CRT) aesthetics of the 1980s and 90s.
This is not just a filter overlay; it is a generative reconstruction of your image data.
Key Features & Benefits
Why is this considered the best-in-class Glitch Art Generator? It strikes the perfect balance between randomness (chaos) and user control (design). Here are the standout features that separate this tool from basic mobile app filters.
1. Advanced RGB Channel Splitting
Most tools offer a simple color shift. Our generator allows for granular control over the angle, distance, and opacity of the Red, Green, and Blue channels. This is essential for achieving that high-energy, cyberpunk look where the subject seems to be vibrating off the screen.
2. Intelligent Pixel Shifting
The tool includes a "smart sort" feature. Instead of randomly dragging pixels, it identifies high-contrast edges in your photo. This ensures that while the texture of the image "melts," the subject remains recognizable. It preserves the integrity of faces or logos while distorting the background.
3. Non-Destructive Workflow
Experiment freely. The generator allows you to layer multiple glitch effects without permanently destroying your original image data until you are ready to export.
4. High-Resolution Export
Many online generators compress images, making them unusable for print or professional web design. This tool supports lossless export, meaning your glitched masterpiece is ready for 4K displays, album covers, or large-format print posters.
5. Customizable "Seed" Randomization
Glitch art is about happy accidents. The "Randomize Seed" feature lets you roll the dice on different distortion patterns while keeping your base settings (intensity, brightness) locked in.
Step-by-Step Guide: How to Create Cyberpunk Art
Ready to break the internet? Follow this guide to get the most out of the Glitch Art Generator.
Step 1: Image Selection and Upload
The quality of the glitch depends on the input.
- Pro Tip: Choose images with high contrast and distinct subjects. Photos with neon lighting, night scenes, or stark black-and-white portraits work best.
- Upload your high-res file to the generator.
Step 2: Apply the "Base" Distortion
Start with the global settings.
- Horizontal tearing: Slide this slightly to create the effect of a bad TV signal.
- Scanlines: Add a subtle overlay of horizontal lines to mimic a CRT monitor.
Step 3: RGB Channel Splitting (The Cyberpunk Look)
This is where the magic happens.
- Locate the RGB Shift or Channel Split tab.
- Increase the "Offset" value. You will see the red and cyan colors separate from the subject.
- Expert Advice: Keep the offset relatively small for portraits (to keep eyes sharp) but push it to the maximum for backgrounds or typography.
Step 4: Pixel Sorting and Melting
If you want a surreal, abstract look:
- Activate Pixel Sorting.
- Adjust the "Threshold." A low threshold melts the whole image; a high threshold only melts the brightest highlights.
- Play with the direction (Vertical vs. Horizontal). Vertical sorting looks like dripping paint/data; horizontal sorting looks like speed or motion blur.
Step 5: Fine-Tuning and Noise
Add the finishing touches.
- Digital Noise/Grain: Add a layer of ISO grain to bind the pixels together. This makes the glitch look organic and analog rather than purely digital.
- Brightness/Contrast: Glitch effects often darken an image. Bump the contrast to make the neon colors pop.
Step 6: Export
Select your format. PNG is recommended for digital art to preserve transparency and color fidelity. JPG is suitable for social media uploads.
Expert Tips: How to Get the Most Out of This Tool
To transition from a novice user to a glitch art pro, keep these technical tips in mind:
1. The "Rule of Brightness" Pixel sorting algorithms usually latch onto luminance (brightness). If you want a specific part of your image to "glitch out," try brightening that specific area in a photo editor before uploading it to the generator. The tool will react more aggressively to the brighter pixels.
2. Layering is Key Don't try to do everything in one pass.
- Pass 1: Apply a light RGB shift. Export.
- Pass 2: Re-upload the result and apply heavy pixel sorting to just the bottom half.
- This technique creates depth and complexity that a single-pass filter cannot achieve.
3. Typography and Glitch This generator is incredible for logos and text. However, text requires readability. Use the Masking feature (if available) or keep distortions linear (horizontal) so that the letters remain legible even when distorted.
Why You Need This Tool (Use Cases)
The glitch aesthetic is more than a trend; it's a visual language that speaks to technology, dystopia, and modern anxiety. Here is how different creatives are utilizing the Glitch Art Generator:
1. Musicians and Producers
From Synthwave to Dubstep, glitch art is the standard for album covers and Spotify canvases. It visually represents synthesized sound and heavy bass.
2. Streamers and Gamers
Create custom overlays, "Stream Starting Soon" screens, or profile banners that fit the aesthetic of games like Cyberpunk 2077, Valorant, or Overwatch.
3. Brand Designers
Edgy, youth-oriented brands (energy drinks, tech startups, streetwear) use glitch effects to signal that they are disruptive and modern. It stops the scroll on Instagram ads.
4. NFT Artists
Generative art is massive in the Web3 space. Using this tool to create variations of a base character or scene allows artists to produce unique, high-value digital assets efficiently.
Frequently Asked Questions (FAQ)
Q1: Can I use the images I generate for commercial purposes? A: Absolutely. Once you download your image, you own the rights to the artwork. The generator is a tool, much like a paintbrush. Whether it’s for a client project, a merchandise line, or an album cover, your creation is yours.
Q2: What is the difference between this and a Photoshop Action? A: Photoshop actions are static—they apply the exact same steps to every photo, often leading to poor results if the lighting doesn't match. This Glitch Art Generator uses dynamic algorithms that analyze your specific image to apply distortions where they make sense visually, saving you hours of manual tweaking.
Q3: Does this tool reduce image quality? A: No. We prioritize professional fidelity. While the aesthetic is "lo-fi" and distorted, the file quality remains high-definition. We support high-resolution exports suitable for print.
Q4: Which file formats works best for uploading? A: We recommend uploading high-quality JPEGs or PNGs. The higher the resolution of the source image, the more detailed the pixel sorting and distortion effects will appear.
Conclusion
The digital world is often too clean, too polished, and too predictable. Glitch art disrupts that monotony. It transforms the ordinary into the extraordinary, turning a simple portrait into a narrative about technology and identity.
Whether you are looking to create the next viral album cover, spice up your social media presence, or simply explore the beauty of digital imperfection, the Glitch Art Generator is your essential companion.
Stop settling for stock filters. Start breaking the rules of design.