Raspberry Pi Smart Mirror
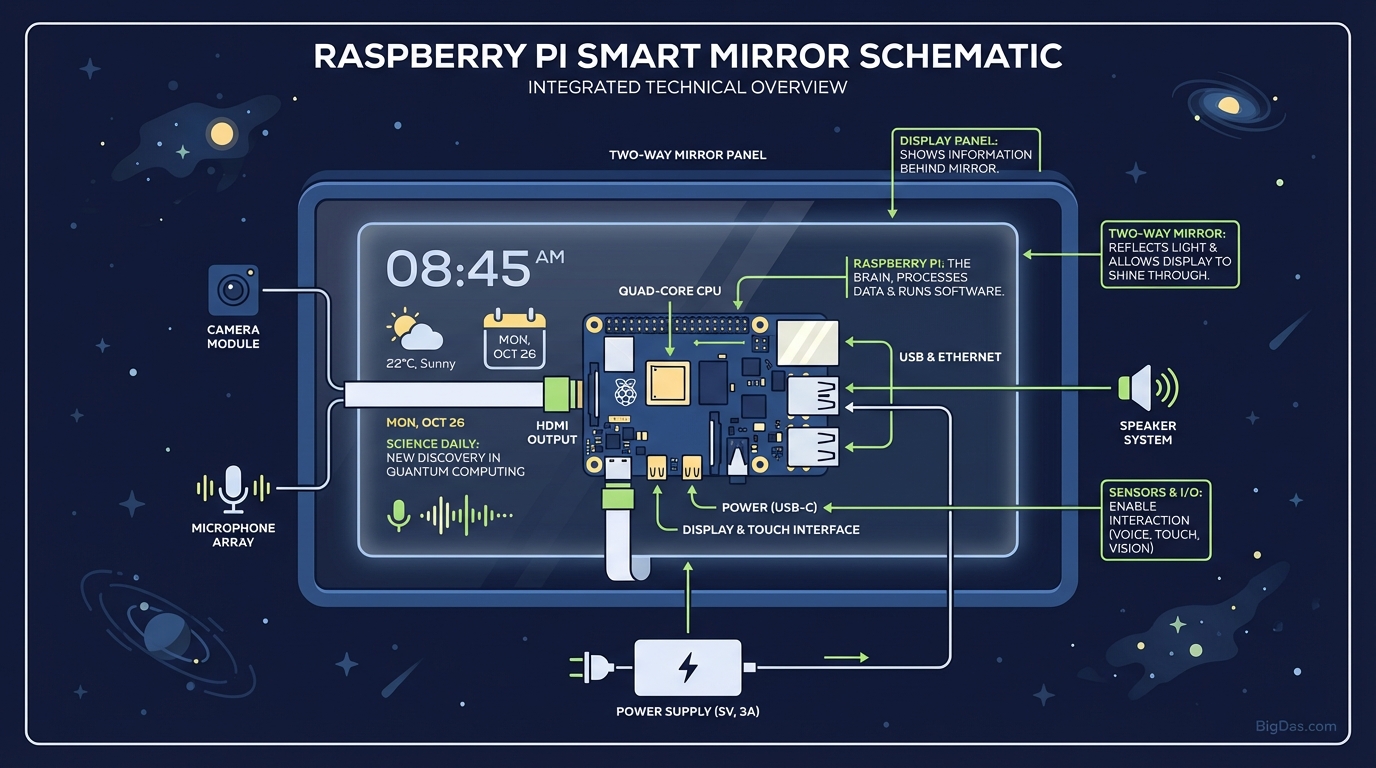 Modern scientific illustration of Raspberry Pi Smart Mirror
Build the Future: The Ultimate Guide to the Raspberry Pi Smart Mirror
Imagine starting your day not by scrolling through a chaotic smartphone feed, but by glancing at your reflection. As you brush your teeth, the mirror seamlessly displays the morning weather, your commute time, the latest headlines, and your Google Calendar schedule—floating holographically over your reflection.
This isn’t a scene from Iron Man or Black Mirror; this is a reality you can build today.
Welcome to the world of the Raspberry Pi Smart Mirror. This tool is the gold standard in DIY home automation, blending high-end aesthetics with raw technical utility. Whether you are a seasoned developer or a curiosity-driven beginner, building a smart mirror is the ultimate project to elevate your living space and streamline your life.
In this deep dive, we will explore exactly what this tool is, why it is the "best in class" solution for home information displays, and provide a comprehensive guide on how to build and optimize your own.
What is a Raspberry Pi Smart Mirror?
A Raspberry Pi Smart Mirror is a customized digital display that sits behind a two-way mirror (also known as a one-way mirror). The concept relies on a simple optical trick: the mirror reflects light from the front (your face) while allowing light from the back (the display monitor) to pass through.
When the monitor behind the glass displays white text on a black background, the black background "disappears," and the text appears to float on the surface of the mirror.
The Brains: Raspberry Pi
At the heart of this tool is the Raspberry Pi—a credit-card-sized computer that costs very little but packs enough processing power to run a full operating system. When paired with the open-source MagicMirror² platform (the industry-standard software for this specific tool), the Raspberry Pi transforms a standard piece of glass into a dynamic information hub.
Unlike commercial smart displays (like the Amazon Echo Show or Google Nest Hub), the Raspberry Pi Smart Mirror is:
- Privacy-First: You own your data. There are no always-on microphones unless you specifically install them.
- Highly Customizable: You decide what modules appear, from cryptocurrency trackers to Formula 1 standings.
- Aesthetic: It looks like a piece of high-end furniture, not a clunky gadget.
Key Features & Benefits
Why is the Raspberry Pi Smart Mirror considered the best tool in the smart home ecosystem? It comes down to the perfect convergence of hardware capability and software flexibility.
1. Modular Information Dashboard
The display is broken down into "modules." You can position these anywhere on the screen. Standard modules include:
- Clock & Date: High-precision digital or analog time.
- Current Weather & Forecast: Localized data including wind, humidity, and sunset times.
- News Feed: RSS feeds from your favorite sources (BBC, NYT, TechCrunch).
- Calendar: Syncs with iCloud, Google Calendar, or Microsoft Outlook.
2. Extensible Functionality (Third-Party Modules)
Because this tool is supported by a massive community, there are thousands of add-ons available. You can add:
- Spotify/Sonos Now Playing: See what music is playing in the house.
- Commute Times: Real-time traffic data to your workplace.
- Smart Home Control: Monitor Philips Hue lights or Nest thermostat status.
- Facial Recognition: The mirror can detect who is looking at it and customize the profile (e.g., show Dad’s calendar vs. Mom’s commute).
3. Voice Control Integration
With the addition of a simple USB microphone, your Raspberry Pi Smart Mirror can integrate with Google Assistant or Amazon Alexa, turning your mirror into a massive visual smart speaker.
4. Low Power Consumption
Using a Raspberry Pi (specifically models like the Pi 4 or Pi Zero 2 W) ensures the device draws minimal electricity, costing pennies per month to run, even if left on 24/7.
Step-by-Step Guide: How to Build and Use It
Building a Raspberry Pi Smart Mirror might seem daunting, but it is effectively a three-phase process: Hardware, Assembly, and Software.
Here is how to execute this project like a pro.
Phase 1: The Hardware Checklist
To build the best-in-class mirror, do not skimp on the glass. Here is what you need:
- Raspberry Pi 4 (Model B) or Pi Zero 2 W: The Pi 4 offers better performance for video and heavy modules.
- MicroSD Card (32GB+): High-speed class 10.
- Monitor: An old LCD/LED monitor with HDMI input. (IPS panels offer the best viewing angles).
- Two-Way Mirror: You can buy acrylic (cheaper, prone to warping) or glass (premium, heavy, perfect reflection). Recommendation: Go for glass for a professional finish.
- Frame: Custom wood or metal frame to hold the glass and monitor.
- Power Supply: Official Raspberry Pi power supply and power for the monitor.
Phase 2: Assembly
- Strip the Monitor: Remove the plastic casing (bezel) of your monitor to expose the bare metal chassis and screen. This makes it thinner and easier to fit behind the glass.
- Build the Frame: Construct a box frame deep enough to house the monitor and the Pi.
- Apply the Mirror: Place the two-way mirror at the front of the frame.
- Mount the Screen: Secure the monitor directly against the glass. Ensure there is no light leakage; use black electrical tape around the edges of the monitor screen.
- Connect the Pi: Mount the Raspberry Pi inside the frame using adhesive standoffs. Connect the HDMI and power cables.
Phase 3: Software Installation (The Magic)
This is where the tool comes to life. We will use the MagicMirror² open-source platform.
- Install OS: Flash Raspberry Pi OS (with Desktop) onto your MicroSD card using the Raspberry Pi Imager.
- Boot Up: Insert the card into the Pi, connect a mouse/keyboard, and boot up. Connect to WiFi.
- Install MagicMirror²: Open the Terminal and run the automatic installation script:
bash -c "$(curl -sL https://raw.githubusercontent.com/MichMich/MagicMirror/master/installers/raspberry.sh)" - Auto-Start: The installer will ask if you want to use PM2 for auto-starting. Select Yes. This ensures the mirror software loads automatically if the power flickers.
Phase 4: Configuration
To customize your mirror, you will edit the config.js file found in the /MagicMirror/config/ folder.
- Positioning: You can move modules to
top_left,bottom_right,middle_center, etc. - API Keys: For weather and news, you will need to sign up for free API keys (e.g., OpenWeatherMap) and paste them into the code.
Expert Advice: Getting the Most Out of Your Tool
As a technical expert, I have identified three critical optimizations that separate a "hobby project" from a "professional appliance."
1. Motion Sensor Integration
Don't burn out your monitor by leaving it on 24/7.
- The Hack: Wire a PIR Motion Sensor to the Raspberry Pi GPIO pins.
- The Result: Install the
MMM-PIR-Sensormodule. The screen will physically turn off (saving power and extending lifespan) when no one is in the room, and instantly wake up when you walk in.
2. Solve the "Heat" Problem
Monitors and computers generate heat. If you seal them in a wooden frame against a wall, they can overheat.
- The Fix: Drill ventilation holes at the bottom and top of your frame to create natural convection airflow. If using a Raspberry Pi 4, ensure it has a heatsink case or a small fan.
3. Orientation Matters
Most people build landscape mirrors, but portrait mode is superior for Smart Mirrors.
- Why? It mimics the human body's reflection and allows for longer lists (calendars, news feeds) to be displayed without cluttering the center of the mirror where your face should be.
- How: Edit the Raspberry Pi display settings (
/boot/config.txt) to rotate the HDMI output 90 degrees.
Why You Need This Tool (Use Cases)
Is this just a cool gadget, or does it add value? Here is why the Raspberry Pi Smart Mirror is an essential tool for modern living.
The Productivity Powerhouse
For freelancers and entrepreneurs, time is money. Having your Google Calendar, Trello Board, and Stock Portfolio visible the moment you wake up allows you to mentally prep for the day while brushing your teeth. It removes the friction of logging into a laptop.
The Family Command Center
Place the mirror in a hallway or kitchen.
- Shared Calendars: No more "I forgot you had soccer practice."
- Chore Lists: Display a rotating list of household tasks.
- Meal Plans: Show the dinner menu for the week.
The Aesthetic Upgrade
Interior design is moving toward "invisible tech." A television is a black void when turned off; a Smart Mirror is a functional mirror that expands the perceived space of a room. It adds a futuristic, luxury feel to any bathroom or entryway without cluttering surfaces with plastic hubs.
Frequently Asked Questions (FAQ)
1. Do I need to know how to code to build this?
No. While it helps to be comfortable with computers, the installation process is largely copy-and-paste. If you stick to the standard modules, you only need to edit text files (changing "New York" to "London," for example).
2. Can I use an old laptop screen?
Technically yes, but it is difficult. Laptop screens do not have HDMI ports; they use LVDS or eDP ribbons. You would need to buy a specific "Controller Board" for your exact screen model number. It is much easier to use a standard desktop monitor with an HDMI input.
3. How much does a Raspberry Pi Smart Mirror cost?
If you repurpose an old monitor, the cost is surprisingly low.
- Raspberry Pi + SD Card: ~$50 - $75
- Two-Way Glass/Acrylic: ~$30 - $100 (depending on size/quality)
- Wood/Frame materials: ~$30 Total Estimate: $110 - $200. Comparing this to pre-built smart mirrors that retail for $1,000+, this is a massive bargain.
4. Does the mirror still work as a mirror?
Yes. Because the background of the interface is black, no light comes through those areas. The reflection remains crisp. The only time the reflection is slightly dimmed is directly over the white text, but for grooming and dressing, it functions perfectly.
5. Can I watch videos on it?
Yes. There are modules for YouTube and casting (AirPlay/Chromecast). However, keep in mind that watching a movie on a reflective surface can be distracting. It is best used for short clips or music videos.
Conclusion
The Raspberry Pi Smart Mirror is more than just a DIY project; it is a lifestyle upgrade. It represents the perfect marriage of form and function, taking a stagnant object—the mirror—and transforming it into an intelligent assistant that respects your time and privacy.
By building this tool, you aren't just assembling electronics; you are curating your environment. You are taking control of how you consume information. Whether you want to streamline your morning routine, manage your family's chaotic schedule, or simply impress every guest who walks through your door, the Smart Mirror is the ultimate solution.
Ready to build the future? Grab your Raspberry Pi, source your glass, and start coding your reflection today.
Disclaimer: This guide assumes basic familiarity with tools and electronics. Always ensure safety when working with glass and electrical components.