Projectile Motion
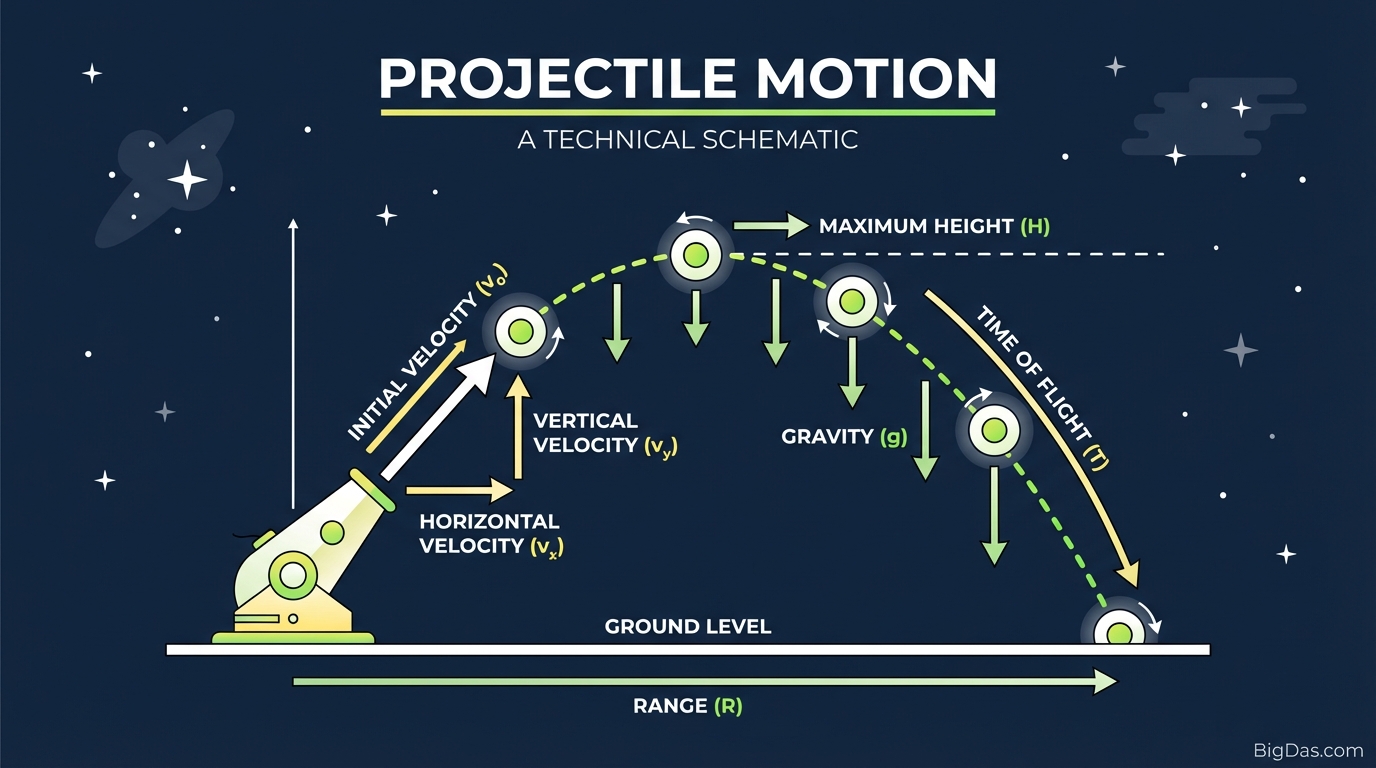 Modern scientific illustration of Projectile Motion
Master Physics with the Ultimate Projectile Motion Calculator & Simulation
Physics is the language of the universe, but for many students, engineers, and hobbyists, the dialect can be incredibly difficult to speak. We have all stared at a sheet of paper, wrestling with kinematic equations, trying to visualize how a ball travels through the air. The math says one thing, but your intuition might say another.
Static textbook diagrams simply aren’t enough to grasp the dynamic nature of the physical world. To truly understand how objects move under the influence of gravity, you need to see the variables change in real-time.
Enter the Projectile Motion Tool—the definitive, interactive physics simulation designed to bridge the gap between abstract mathematical theory and visual reality. Whether you are an AP Physics student trying to ace an exam, a game developer tweaking ballistics for a new project, or a teacher looking for the perfect classroom demonstration, this tool is your best-in-class solution for calculating and visualizing parabolic trajectories.
In this guide, we will deep-dive into the science of projectile motion, explore the features of this industry-leading tool, and show you exactly how to use it to solve complex kinematic problems in seconds.
What is Projectile Motion? (The Science Behind the Simulation)
Before we start launching virtual projectiles, it is crucial to understand the physics that this tool calculates.
Projectile motion creates a form of motion experienced by an object or particle (a projectile) that is thrown near the Earth's surface and moves along a curved path under the action of gravity only.
In a vacuum (which this tool simulates for mathematical precision), the only force acting on the object is gravity. This results in a specific curve known as a parabola.
The Two Dimensions of Motion
The beauty of this tool is that it helps you visualize the decomposition of vectors. Projectile motion is actually two independent motions happening simultaneously:
- Horizontal Motion ($x$-axis): In the absence of air resistance, the horizontal velocity remains constant. The projectile covers equal horizontal distances in equal time intervals.
- Vertical Motion ($y$-axis): The vertical velocity changes constantly due to gravity ($9.8 m/s^2$ on Earth). The object decelerates as it goes up, momentarily stops at the peak, and accelerates as it comes down.
Key Variables in the Equation
Our Projectile Motion Tool calculates these variables instantly, but understanding them allows you to get more out of the simulation:
- Initial Velocity ($v_0$): The speed at which the object is launched.
- Launch Angle ($\theta$): The angle of the launch relative to the horizontal plane.
- Gravity ($g$): The downward acceleration force.
- Range ($R$): The total horizontal distance covered.
- Maximum Height ($H$): The highest vertical point reached by the projectile.
Key Features & Benefits of the Projectile Motion Tool
Why use this simulation over a standard scientific calculator? Because context matters. This tool isn't just a calculator; it is a high-fidelity physics engine accessible from your browser.
1. Dynamic Variable Adjustment
Most calculators force you to re-enter data for every single change. Our tool features live sliders and input fields for:
- Velocity: Crank up the speed to see how linear velocity impacts distance.
- Angle: Sweep from 0° to 90° to find the sweet spot for maximum range.
- Gravity: Don't just stay on Earth. Adjust the gravitational constant to simulate motion on the Moon, Mars, or Jupiter.
2. Real-Time Trajectory Visualization
Visual learners thrive with this tool. As you adjust the inputs, the parabolic curve updates instantly. You can visually trace the path from the launch point ($0,0$) to the impact point, allowing you to "feel" the physics rather than just calculating it.
3. Precision Calculation
While the visual simulation provides the "big picture," the tool simultaneously computes the hard data. It provides exact values for:
- Total Flight Time ($t$)
- Maximum Height ($H_{max}$)
- Horizontal Range ($R$)
4. Zero-Latency Feedback Loop
The most effective way to learn physics is through experimentation. By removing the time-consuming process of hand-writing equations, you can run dozens of simulations in the time it takes to solve one problem on paper. This accelerates learning and comprehension.
Step-by-Step Guide: How to Use the Simulation
Ready to launch? Follow this guide to master the tool.
Step 1: Set Your Environment (Gravity)
Start by deciding where your simulation is taking place.
- Standard Physics Problem: Leave the gravity setting at $9.8 m/s^2$ (Earth).
- Space Exploration: Change the gravity to $1.62 m/s^2$ to simulate the Moon. You will notice the projectile floats longer and travels significantly further.
Step 2: Determine Initial Velocity
Input the speed at which your projectile leaves the origin.
- Tip: If you are solving a specific homework problem, ensure your units match (usually meters per second). Higher velocity will flatten the beginning of the curve and extend the range.
Step 3: Adjust the Launch Angle
This is where the magic happens. Move the angle slider.
- Low Angle (< 30°): The object stays low to the ground and lands quickly.
- High Angle (> 60°): The object shoots high into the air but sacrifices horizontal distance.
- The Sweet Spot: Try setting it to 45°. In ideal physics (without air resistance), this is mathematically proven to provide the maximum range.
Step 4: Analyze the Results
Once your variables are set, look at the output data. Compare the Maximum Height against the Range.
- Experiment: Try to hit a specific target distance (e.g., 100 meters) by adjusting only the angle while keeping velocity constant.
How to Get the Most Out of This Tool (Advanced Tips)
To move from a beginner user to a physics master, try these specific simulation exercises:
The "Complementary Angles" Experiment
Physics dictates that two different angles can produce the exact same range if they add up to 90° (provided the velocity is the same).
- Try this: Set your velocity to $20 m/s$.
- Test 1: Launch at 30°. Note the landing spot.
- Test 2: Launch at 60°.
- Result: You will see the projectile land in the exact same spot, but the 60° launch will reach a much higher peak altitude. This visual proof is often a "lightbulb moment" for students.
The "Gravity vs. Height" Relationship
Keep velocity and angle constant, but cut gravity in half. You will notice the maximum height doubles. This linear relationship helps engineers understand how forces scale in different environments.
Why You Need This Tool: Top Use Cases
This isn't just for homework. The Projectile Motion Tool is a versatile utility for various professionals and enthusiasts.
1. Students and Educators
- Visualizing Calculus/Physics: Teachers can project this tool on a whiteboard to demonstrate how changing variables affects the graph $y(x)$.
- Homework Verification: Students can solve the equation on paper and use the tool to check their answers immediately.
2. Game Developers & Programmers
- Ballistics Tuning: If you are coding a game in Unity or Unreal Engine (like an archery game or an Angry Birds clone), you need to understand how jump arcs work. Use this tool to prototype "game feel" before writing the code.
3. Engineering & Ballistics
- Quick Estimations: Engineers working on fluid dynamics (jets of water) or ballistics can use this for rapid, first-pass estimations of trajectory without needing heavy simulation software like MATLAB initially.
4. Sports Science Enthusiasts
- Golf & Baseball: Curious about the optimal angle to hit a home run or drive a golf ball? While air resistance plays a role in real sports, this tool helps visualize the foundational mechanics of the perfect swing.
Frequently Asked Questions (FAQ)
1. Does the mass of the projectile affect the trajectory in this simulation?
In ideal projectile motion physics (which neglects air resistance), mass does not affect the trajectory. A bowling ball and a feather would follow the exact same path and hit the ground at the same time if launched in a vacuum. This tool simulates ideal kinematic physics.
2. What is the optimal angle for maximum distance?
Assuming the launch and landing points are at the same height, 45 degrees is the optimal angle for maximum range. If you launch at an angle lower or higher than 45 degrees, the horizontal distance decreases.
3. Why is the path a parabola?
The path is parabolic because the horizontal velocity is constant (moving the object forward at a steady rate) while the vertical velocity changes linearly due to gravity (pulling it down faster and faster). The combination of linear horizontal motion and quadratic vertical motion creates the parabolic curve $y = ax^2 + bx + c$.
4. Can I use this tool for projectile motion on other planets?
Yes! By adjusting the Gravity parameter, you can simulate motion on any celestial body. For example, inputting $3.7 m/s^2$ will simulate Mars, while $24.79 m/s^2$ will simulate Jupiter.
Conclusion
Understanding kinematics doesn't have to be a struggle against invisible forces and abstract equations. The Projectile Motion Tool transforms complex physics into an intuitive, visual experience. By manipulating gravity, velocity, and angles, you gain a tangible understanding of how the world moves.
Whether you are checking your homework, designing the next hit video game, or simply satisfying your curiosity about physics, accurate simulation is the key to mastery.
Ready to defy gravity? Scroll up to the tool, set your parameters, and launch your first simulation today!