Ripple Tank
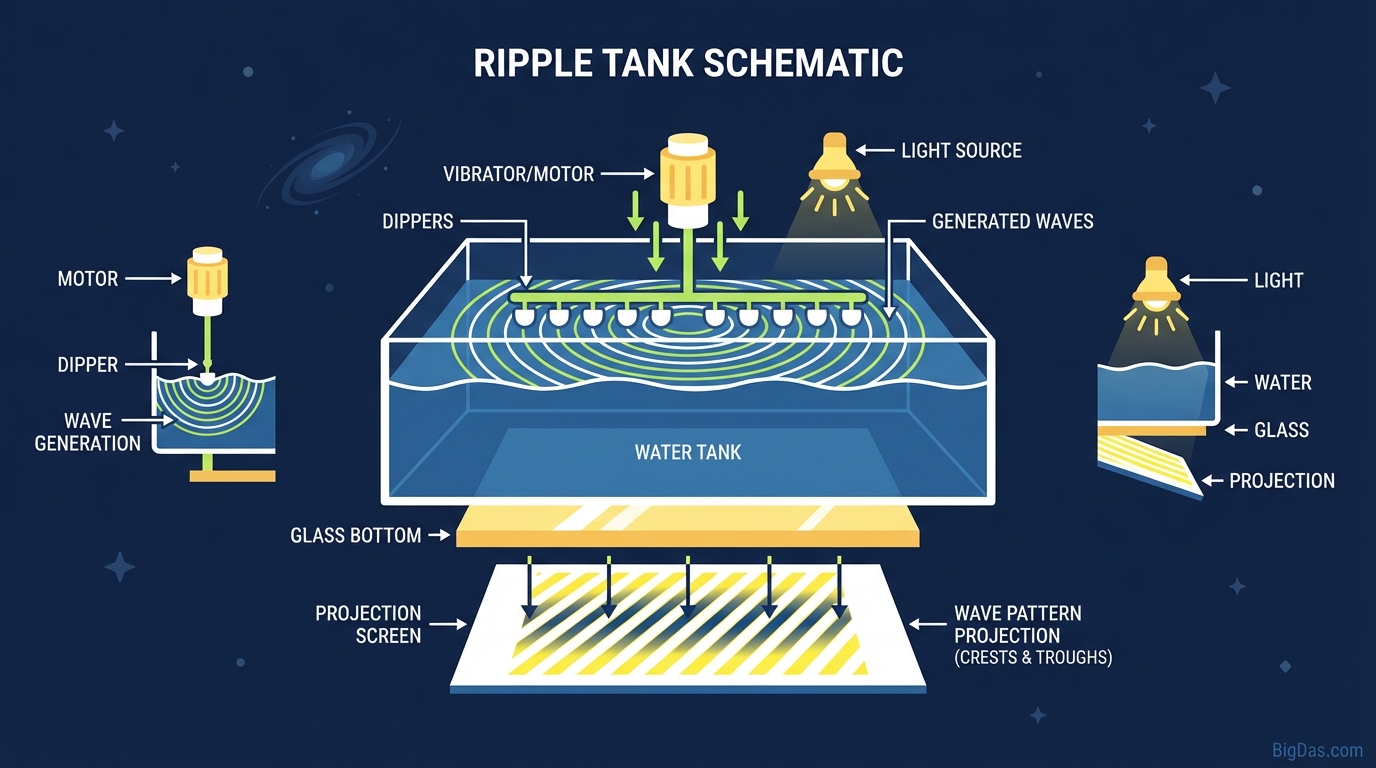 Modern scientific illustration of Ripple Tank
Master Wave Physics: The Ultimate Guide to the Ripple Tank Simulation
Understanding the behavior of waves is one of the most challenging aspects of physics. Whether you are studying sound, light, or fluid dynamics, visualizing how waves move, reflect, and interfere with one another is notoriously difficult when relying on static textbook diagrams.
Traditional physical ripple tanks—shallow glass trays filled with water and illuminated by a strobe light—are bulky, messy, and difficult to set up. They are prone to leaks, require precise calibration, and often yield blurry results.
Enter the virtual Ripple Tank.
This cutting-edge tool allows you to interact with a high-fidelity virtual water surface directly from your browser. It is the best-in-class simulation for visualizing wave phenomena, offering a seamless blend of accuracy, interactivity, and ease of use.
In this guide, we will dive deep into what the Ripple Tank tool is, the physics behind it, and how you can leverage its powerful features to master the complexities of wave propagation.
What is the Ripple Tank?
At its core, the Ripple Tank is a sophisticated physics engine that simulates the mathematical wave equation in real-time. It visualizes a two-dimensional scalar field, representing the height of water (or pressure in air, or electric field strength) at every point on a grid.
While it is styled to look like water for intuitive understanding, the simulation is a powerful analog for all wave-based phenomena, including:
- Acoustics (Sound Waves)
- Optics (Light Waves)
- Electromagnetism
Unlike older Java applets or low-resolution flash games, this Ripple Tank tool utilizes modern WebGL and HTML5 acceleration to calculate wave propagation at high frame rates. This means you can interact with the surface—create splashes, draw walls, and move sources—and watch the simulation react instantly without lag.
It is the definitive tool for students, educators, and professionals who need to visualize interference, diffraction, refraction, and the Doppler effect in a controlled, noise-free environment.
Key Features & Benefits
Why is this specific Ripple Tank considered the best on the market? It comes down to the balance between user-friendly design and deep technical capability.
1. High-Resolution Wave Rendering
The tool renders waves with exceptional clarity. You can visualize high-frequency ripples and low-frequency swells simultaneously. The simulation uses color mapping or 3D height mapping to show crests (peaks) and troughs (valleys) distinctly, allowing for precise observation of constructive and destructive interference.
2. Multiple Source Types
You aren’t limited to a single finger tap. The tool provides a suite of wave generators:
- Point Sources: Simulates a stone dropped in water or a spherical sound wave.
- Plane Waves: Simulates ocean swells or parallel light beams.
- Moving Sources: Allows for the demonstration of the Doppler Effect.
- Multi-Frequency Sources: To study beats and complex harmonics.
3. Interactive Obstacles and Walls
This is where the simulation shines. You can "draw" barriers directly onto the water surface.
- Create solid walls to study reflection.
- Create gaps (slits) to demonstrate diffraction.
- Create prisms/lenses (regions of different wave speed) to simulate refraction.
4. Precision Parameter Control
Unlike a physical tank where changing the frequency involves adjusting a mechanical motor, this tool gives you slider-based control over:
- Frequency: How fast the waves oscillate.
- Amplitude: The height/strength of the wave.
- Damping: How quickly the wave energy dissipates (simulating viscosity).
Step-by-Step Guide: How to Use the Ripple Tank
Ready to create your own interference patterns? Follow this guide to get the most out of the interface.
Step 1: Initialize the Surface
When you load the Ripple Tank, you will likely see a default simulation (usually a single drop).
- Clear the Tank: Look for a "Clear" or "Reset" button to stop all waves and remove obstacles. This gives you a flat, calm surface to start your experiment.
Step 2: Add Your Source
- Mouse Interaction: Simply click and drag your mouse across the black canvas. You will see ripples emanating from your cursor. This acts as a temporary disturbance.
- Continuous Sources: Select a "Single Source" or "Dipole" from the setup menu. This creates a rhythmic, oscillating wave generator. Move it to the center of the screen to see concentric circles radiating outward.
Step 3: Define the Environment
Now, let’s add geometry.
- Select the "Wall" or "Bar" tool.
- Draw a straight line across the center of the tank.
- Create a Slit: Use the eraser tool (or leave a gap while drawing) to create a small opening in the wall. This setup is crucial for observing diffraction (how waves bend around corners).
Step 4: Adjust the Physics
To see distinct patterns, you need to tune the waves.
- Low Frequency: Best for seeing individual wavefronts and teaching the basics.
- High Frequency: Essential for visualizing tight interference patterns and ray-like behavior.
- Stop/Freeze: Use the pause button to freeze time. This allows you to inspect the "phase" of the wave at a specific moment.
Step 5: Advanced Visualization (3D View)
Switch the view mode from 2D (top-down) to 3D. This renders the simulation as a terrain. This perspective is incredibly useful for understanding that waves are energy moving through a medium, moving up and down rather than just "forward."
Why You Need This Tool: Top Use Cases
The Ripple Tank isn't just a toy; it is a utility with diverse applications.
For Educators and Teachers
Physics teachers know the struggle of explaining Young's Double-Slit Experiment on a whiteboard. With this tool, you can set up two point-sources next to each other and instantly show the nodal lines (where waves cancel out) and antinodal lines (where waves amplify). It turns abstract algebra into visual reality.
For Students
If you are struggling with homework on optics or acoustics, this tool acts as a sandbox.
- Confused about Refraction? Draw a "slow medium" shape (like a glass lens) and send plane waves through it. Watch how the waves slow down and bend, converging at a focal point.
- Confused about the Doppler Effect? Drag a source rapidly across the screen and watch the waves bunch up in front and spread out behind.
For Acoustics Engineers
Before running complex CFD (Computational Fluid Dynamics) or acoustic simulations in expensive software, engineers can use the Ripple Tank for rapid prototyping. It provides a quick "sanity check" on how sound waves might diffract around a barrier or reflect off a hard surface in a room design.
For Technical Artists
The fluid motion of the Ripple Tank is mesmerizing. Digital artists and creative coders use the tool to generate height maps and interference patterns that serve as textures for 3D modeling or motion graphics backgrounds.
Advanced Tips: Getting the Most Out of the Tool
To truly leverage the power of this simulation, you need to move beyond simple splashes. Here are expert tips for power users:
1. The Resolution vs. Speed Trade-off If you are running the simulation on an older device, lower the grid resolution. However, for the most accurate diffraction patterns, maximize the resolution. Higher resolution reduces "numerical dispersion" (pixelated artifacts) and makes the physics more true-to-life.
2. Visualizing Phase Use the "Stroboscope" mode if available, or manually toggle the background color. By syncing the color shifts with the wave frequency, you can make moving waves appear "stationary," allowing you to analyze the wave structure closely.
3. Simulating "Stealth" Technology Try to build a shape that reflects waves away from the source. By creating angular geometries (similar to a stealth bomber), you can observe how the reflected energy is scattered in different directions, minimizing the "radar cross-section" in the simulation.
Frequently Asked Questions (FAQ)
1. Is the Ripple Tank accurate enough for scientific research?
While this tool is highly accurate for educational and qualitative analysis, it is a discrete grid approximation. It solves the wave equation numerically. For high-stakes engineering or scientific publishing, specialized CFD software is recommended. However, for conceptual physics, it is the industry standard for speed and visual fidelity.
2. Can I simulate sound waves with this?
Yes. Although the visualization looks like water ripples, the physics of wave propagation (reflection, diffraction, interference) is identical for sound waves in 2D space. You can view the "crests" as high-pressure zones and "troughs" as low-pressure zones.
3. Why do the waves eventually die out?
This is due to the Damping parameter. In the real world, energy is lost to heat or friction. The simulation includes a damping coefficient to mimic this reality. If you want waves to travel forever (idealized physics), turn the damping slider to zero.
4. What is the difference between a Point Source and a Plane Wave?
A Point Source emits circular waves expanding from a single dot (like a pebble). A Plane Wave emits straight lines moving in one direction (like ocean waves hitting a long beach). Plane waves are best for studying reflection and refraction laws.
Conclusion
The virtual Ripple Tank is more than just a digital toy—it is a window into the invisible forces that shape our universe. From the music we hear to the light we see, wave physics is everywhere.
By removing the physical limitations of water trays and strobes, this tool democratizes access to high-level physics experiments. It allows you to visualize the impossible, test hypotheses in seconds, and gain an intuitive grasp of complex mathematical concepts.
Whether you are a teacher looking to inspire the next generation of physicists, or a student aiming to ace your optics exam, the Ripple Tank is your essential companion.
Ready to make some waves? Launch the Ripple Tank tool now and start experimenting with the physics of the future.